
LUTx 4 - Documentation
LUTx 4 - Documentation
Quick start:
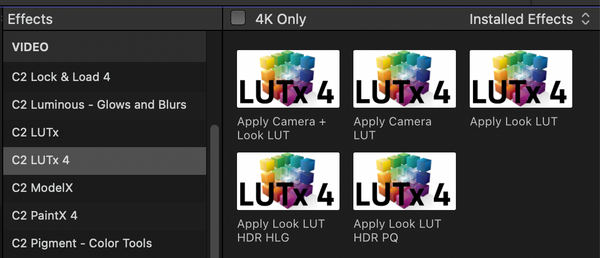
After Installation the plugins appear in category C2 LUTx 4 under effects. Start off by using the plugin Apply Look LUT, in the effects category.
After Applying “Apply Look LUT” to the clip on the timeline. Click on the LUT Browser button to choose a LUT file.
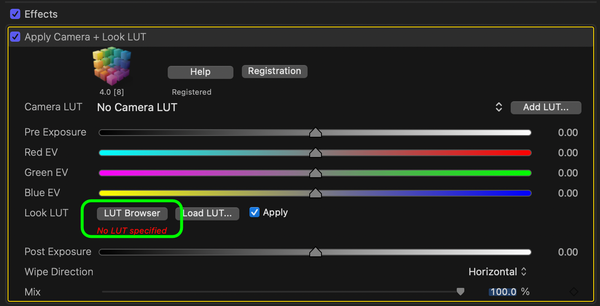
The browser window allows you to preview the LUT on the current clip before you apply it. Double click on the chosen LUT to apply your LUT and close the browser.
The “Apply Camera LUT” effect is specifically for applying technical LUTs for correcting from log colorspace to Rec. 709 color space. It includes LUTs for popular cameras from Canon, Nikon, RED, Sony, Panasonic and others.
Understanding Color Look Up Tables (LUTS)
A look up table in its simplest form is a mapping between input pixel colors and output pixel colors. Camera/Input LUTs can be placed on source footage in log (film) colorspace to convert to Rec. 709 (video) colorspace. Look/Creative/Output LUTs are used on un-graded footage to add a look very quickly. LUTx includes both camera LUTs and collections of Look LUTs grouped into five built in categories.
For best results when using LUTx please pay attention to the following:
-
Camera LUTs should be applied first before any other color correction you do, whether that is using LUTs or the color board.
-
These LUTs are designed for Rec. 709 (video) output and to work on footage in Rec. 709 (video) colorspace. If your footage is log (film) color and you wish to apply a look LUT then use the “Apply Camera + Look” template and chose the correct camera for log conversion first before you choose the look LUT.
-
Look LUTs will look their best when applied to neutral, color-balanced shots, please use the included tools detailed below or the color board to balance your shots before applying LUTs.

Understanding Standard Dynamic Range and High Dynamic Range and LUTs
The majority of footage is shot as Rec. 709 standard dynamic range. LUTx supports working on wide gamut high dynamic range in the Rec 2020 HLG and Rec. 2020 PQ formats. Please use the specific "Apply Look LUT HDR HLG" or "Apply Look LUT HDR PQ" template according to your project. For best results we recommend the footage matches the project setting, eg use only HLG footage in a HLG project.
Most LUT files are made for standard dynamic range footage, to allow these to be used on HDR footage we remap the clip to Rec. 2020 Wide Gamut (standard dynamic range), apply the LUT, then reverse the mapping back to HDR. On most HDR clips this works fine and does not lose any highlight information. If you have extreme highlights please check the video scopes when applying LUTs to make sure there is no clipping.
It can also be useful to use the built in color board in conjunction with LUTx to reduce saturation in highlight after applying a LUT if needed.
The LUT Browser
The LUT Browser window lets you manage collections of LUTs and apply the chosen LUT to your clip. You see a live preview of the LUT on the current selected clip when you open the LUT browser.

Using the buttons at top you can create a new collection, and import additional LUTs. LUTx can use import LUTs you already have, or might find on the internet. It will accept 1D LUT and 3D LUT files in .cube and .dat format. This generally will read any LUT from DaVinci Resolve, Adobe CC Products and other common grading software.
List of included effects
Apply Look LUT:
This is the one you will use most of the time for applying a look to video footage. Use the top four sliders to color balance you clip in relation to other clips in the edit, with overall exposure and exposure in each of the red, green and blue channels. Then click on “LUT Browser” and choose the desired look.
You can wipe the LUT on and off by holding down the mouse and dragging the diamond cursor shown at left. This allows you to compare the LUT to the original footage. The wipe disappears when you release the mouse button, it is just a preview that may be useful when showing the effect to clients or the director. Use the popup “wipe direction” to change between horizontal and vertical wipe.
Apply Camera LUT
This is a simpler version similar to Apply Look LUT except that it loads the LUT from a popup menu of camera choices. Always make sure you apply the Camera LUT first in the effects stack on the clip if you are doing other color corrections later with the color board or other plugins.
Apply Camera + Look LUT
This version includes a popup for choosing the camera type and the LUT browser for choosing a look LUT. If you have a camera that shoots in log (film space) like a Black Magic Cinema Camera shooting in film mode, then you should use this template when you want to to apply a LUT and select the correct camera type first. You then choose a Look Lut to apply the same as the Apply Look Lut template.
Apply Look Lut HDR HLG and Apply Look Lut HDR PQ
Use these instead of Apply Look Lut when working on a rec2020 HDR HLG or PQ project.
Usage of CUBE files - Using the LUTs in other software such as Resolve or Premiere Pro
The zip available on the downloads page contains all of the LUTs in standard CUBE format which can be used in many different software. How to use the CUBE files in other software varies according to each software, see here for Premiere Pro:
How to Add LUTs in Premiere Pro
If you only want to use the LUTs inside Final Cut Pro X, then you do not need these CUBE files so they can be kept or discarded as needed.
Please note you may use these CUBE files on other systems you personally use but according to the terms of our license agreement they cannot be given away or used on other systems you do not own.
Tutorials and Technical Support
We have a page of video tutorials available. To contact our support please use the form here.