ModelX Documentation and Help
Interface Overview

Loading Models
Use load model button to choose a file from the finder, or load from library to choose from out included set of USDZ files. ModelX can currently load USDZ, USDC, obj and STL files.
World Settings / Environment Maps
 The World tab lets you choose a HDR image that generates both lighting and reflections, EXR or HDR image formats can be loaded. You can also load a background image or video here and turn on and off fog and set fog distance.
The Camera

Under the camera tab as well as setting camera position and rotation you can change lens, sensor, depth of field and add some special effects like vignette and grain.
Lighting

Animation
Animation works the same as it does in FCP normal inspector windows. Click the arrow next to the parameter value and set a keyframe and change interpolation as needed. A yellow diamond indicates a keyframe is set at that frame. You can also click the keyframe and delete it.
Re-Texturing
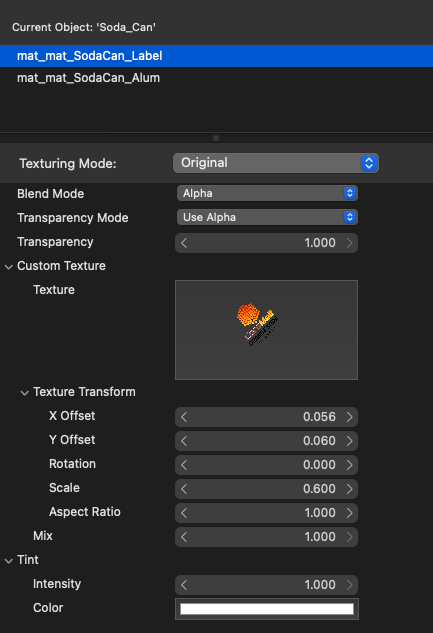
There are three modes with which you can change the texture after selecting an object and a material. The first mode is “original”, this uses all the texture layers from the USDZ file as they are in the file. However we can still overlay a custom texture or decal on top of the existing textures if we want to do something like add a logo or text on to an item. Next you can load from one of our included presets, this replaces all the layers in the model with layers from the presets. You can still apply a custom texture / decal as well. Last you can go into texturing mode “advanced material editing”, this gives you full access to all the layers in the physical based rendering model that are in the USDZ file.
Original Texture mode

In original texture mode you can only overlay a decal / custom texture and apply a tint to the material. All other layers are fixed to be as they are from the loaded 3D model.
Load Presets mode

After loading of our presets you can still apply a decal or custom texture and tint to the object's material.
Advanced Material Editing mode

In this mode you have full control over every layer in the material. These are the layers accessible to be modified in advanced material editing. Each layer can be transformed individually and toggled between "disable", "value", "color", and "image texture".
- Diffuse - sometimes called the beauty pass or base color, contains most of the color information of the surface
- Emission - stays light even when the scene is dark but does not light other objects
- Opacity - defines transparent areas
- Tint - multiples the other layers by a color - usually unassigned
- Normal - the normal maps that define ripples in the surface
- Displacement - can raise or lower a surface depending on value - often unassigned
- Ambient Occlusion - defines areas of the object which are self shadowing eg deep crevices
- Self Illumination - specifies a texture or a color that is added to the lighting contribution of the surface.
- Clear Coat - defines a transparent layer that sits above other layers, often used to simulate car paint
- Clear Coat Roughness - roughness of the clear coat layer
- Clear Coat Normals - normal maps of the clear coat layer
- Metalness - defines which surfaces behave like metals in the way they react to reflected light
- Roughness - Sets smoothness vs coarseness on the surface.
Many models will only use these: Diffuse, Emission, Opacity, Normal, Ambient Occlusion, Metalness, Roughness, Ambient Occlusion, Clear Coat and Clear Coat Roughness. It should be possible to simulate almost any surface just using those eleven layers.
