PaintX 4 Documentation
CoreMelt PaintX 4 allows you to create brush strokes tracked to movement in your video and has many uses. First here is a quick reference guide to the user interface, then we recommend you look at our video tutorials. We also have a hotkey guide sheet.
User interface overview
Press the "open editor" button after you add PaintX to a clip and the PaintX interface will open full screen as shown below. The length of the current shot can be scrubbed using the play controls at bottom. Do your paint work as needed then use the "save changes" button to return to the main FCP X screen with your tracked paint applied to the shot.

Guide to tools in the palette
| Select Tool: use this to transform or move any stroke or layer after it has been created. | |
| Pan Tool: use this to move around the image if you are zoomed in (see viewer zoom at top right) | |
| Color Brush: paint with a solid color with adjustable size, softness and blend mode | |
 |
Color Adjust Brush: lets you paint on a color correction defined as a difference in hue rotation, luminosity and saturation from the pixels below it. |
| Blur Brush: paint a blur effect with adjustable blur strength | |
| Smear Brush: this has the effect of "stretching" the pixels in the direction of your stroke with adjustable range, similar to a directional blur. | |
| Sharpen Brush: Paint a sharpen effect with adjustable sharpen strength. | |
| Warp Brush: Use this to drag pixel under the brush in the direction of movement to change the shape of objects. | |
| Clone Brush: Hold "alt" key and click to set the clone source, then click and drag to clone from the source area to the area under the brush. The offset stays constant for each clone stroke but can be changed with each new stroke. | |
| Noise Brush: use this to apply a noise texture similar to grain to areas under the brush. | |
| Heal Brush: this brush paints the texture from the outside of the brush inwards. It can be used to very quickly remove moles, spots, blemishes or specks of dust. | |
| Erase Brush: use this to erase parts of strokes within the same layer. Note you can also select any stroke and press delete key to remove the entire stroke. | |
| Reveal Source Brush: use this to erase parts of strokes within the same layer. Note you can also select any stroke and press delete key to remove the entire stroke. | |
 |
Toggle Single Frame Strokes: The default is that each stroke lasts the length of the entire clip and follows tracking. If you press this toggle each stroke only lasts one frame so you can paint frame by frame. |
For examples of usage of the above tools please take a look at our list of PaintX tutorials. Start with the overview video below.
Some tips for fine paint work and getting better results:
PaintX has a lot of uses so we can't detail every single usage, there will also be a certain amount of trial and error in learning to use tracked paint efficiently. Keep in mind you can always modify brush strokes after you create them, toggle them on and off, or delete specific brush strokes. All of this is done by using the "Layers & Strokes" window at left and then the bottom left window to edit selected strokes.
Use the checkboxes on layers or strokes to toggle previous strokes on and off to see before and after, either for an entire layer or individual brush strokes. This can help fine tune your work.
Track Group and Layers & Strokes Window

In addition you can then modify any existing stroke using the bottom left window. Options will change depending on what type of stroke is selected. You can change any parameter, including those specific to the tool plus common ones like brush size, opacity etc. You can also use the select tool to pick up individual strokes, move them around, rotate them or scale them. Again this can help you fine your results.
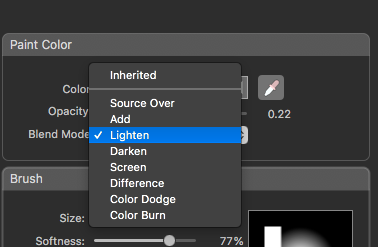
There's often more than way to do something. For example if you want to change the color of something under the brush you can either use the color adjust brush, or you can also change colors of an area by using the color brush and trying different blend modes with a low opacity (eg 20%). Try lighten, screen and add blend modes, with a dark grey color selected and 20% brush opacity. This will also lighten parts of the image under the brush but may be easier for you to control in your specific case. See screenshot. A bit of trial and error will be needed to find the right combination of settings but it should only take a few minutes.
Blend Mode Settings:

Likewise if you wish to remove a small spot or blemish, that could be done with the clone tool, the blur tool or the heal tool. Depending on the exact shot, the movement, and what colors are surrounding the area you need to fix then for some shots one method will be better than another. If you're not getting good results, try another method.
